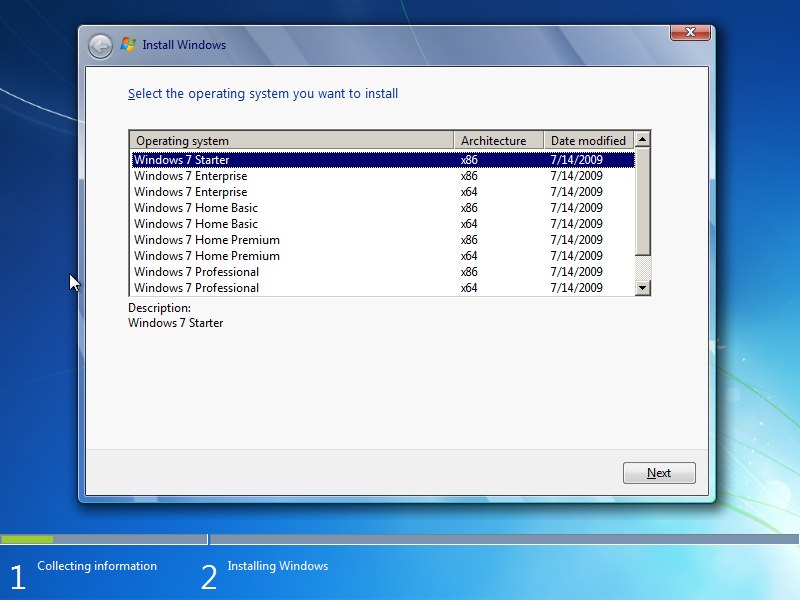
 This article will demonstrate how to merge 11 editions of Microsoft Windows 7 onto a single-layer DVD. Except for the Enterprise edition which is not available to the general public, each edition of Microsoft Windows 7 DVD contains all available editions (Starter (available for x86 only) , Home Basic, Home Premium, Professional and Ultimate), however, is locked into a single edition. So, the use of one each 64-bit (x64) DVD and one 32-bit (x86) DVD will be sufficient to create an all-in-one single-layered DVD.
For this task, the use of the following four MSDN downloaded DVDs are used (Total size: 10,984,568 KB).
-
Microsoft Windows 7 Enterprise (x86) – en_windows_7_enterprise_x86_dvd_x15-70745.iso (2,344,142 KB)
-
Microsoft Windows 7 Enterprise (x64) – en_windows_7_enterprise_x64_dvd_x15-70749.iso (3,048,062 KB)
-
Microsoft Windows 7 Ultimate (x86) – en_windows_7_ultimate_x86_dvd_x15-65921.iso (2,443,256 KB)
-
Microsoft Windows 7 Ultimate (x64) – en_windows_7_ultimate_x64_dvd_x15-65922.iso (3,149,108 KB)
- Windows Automation Installation Kit (WAIK) for Windows 7 – KB3AIK_EN.iso (1,747,600 KB)
The Setup
- Install the Windows Automation Installation Kit.
- Create a folder AIO on the root of your drive with two subfolders DVD and WIMS.
(ie. E:\AIO, E:\AIO\DVD, E:\AIO\WIMS) - Copy the entire Microsoft Windows 7 Ultimate (x86) into the E:\AIO\DVD folder.
Note: The reason for selecting the 32-bit edition over the 64-bit edition is that 64-bit systems support 32-bit operating systems and not vice versa. - Delete ei.cfg from E:\AIO\DVD\sources\
Note: The ei.cfg locks the installation source to a specific edition of Windows. Deleting the file allows for other editions to be installed. - Move and rename the E:\AIO\DVD\sources\install.wim to E:\AIO\WIMS as Windows_7x86_ULT.wim.
- Copy the \sources\install.wim from Microsoft Windows 7 Ultimate (x64) to E:\AIO\WIMS as Windows_7x64_ULT.wim.
- Copy the \sources\install.wim from Microsoft Windows 7 Enterprise (x86) to E:\AIO\WIMS as Windows_7x86_ENT.wim.
- Copy the \sources\install.wim from Microsoft Windows 7 Enterprise (x64) to E:\AIO\WIMS as Windows_7x64_ENT.wim.
A distinct difference between this process versus the other articles throughout the Internet is that E:\AIO\DVD\sources\install.wim is moved to E:\AIO\WIMS and renamed as Windows_7x86_ULT.wim. Other articles will copy install.wim from E:\AIO\DVD\sources to E:\AIO\WIMS or not copy at all. The commands detailed below build off of the install.wim file, appending additional image information and indexes thus increasing the size of the original file. The reason for this difference is that a completely fresh install.wim will be created with maximum compression and with a menu that displays the order of the editions as desired as will be seen later in this article.
The Process
Execute each of the following commands to export each edition of Microsoft Windows from each of the wim files to create the custom install.wim. To access use the Start Menu to find and launch Imagex, Deployment Tools Command Prompt. Scroll to the appendix of this article for additional detail about the commands below.
Imagex /export "E:\AIO\WIMs\Windows_7x86_ULT.wim" 1 "E:\AIO\DVD\sources\install.wim" "Windows 7 STARTER" /compress maximum
Imagex /export "E:\AIO\WIMs\Windows_7x86_ENT.wim" 1 "E:\AIO\DVD\sources\install.wim" "Windows 7 ENTERPRISE" /compress maximum
Imagex /export "E:\AIO\WIMs\Windows_7x64_ENT.wim" 1 "E:\AIO\DVD\sources\install.wim" "Windows 7 ENTERPRISE (x64)" /compress maximum
Imagex /export "E:\AIO\WIMs\Windows_7x86_ULT.wim" 2 "E:\AIO\DVD\sources\install.wim" "Windows 7 HOMEBASIC" /compress maximum
Imagex /export "E:\AIO\WIMs\Windows_7x64_ULT.wim" 1 "E:\AIO\DVD\sources\install.wim" "Windows 7 HOMEBASIC (x64)" /compress maximum
Imagex /export "E:\AIO\WIMs\Windows_7x86_ULT.wim" 3 "E:\AIO\DVD\sources\install.wim" "Windows 7 HOMEPREMIUM" /compress maximum
Imagex /export "E:\AIO\WIMs\Windows_7x64_ULT.wim" 2 "E:\AIO\DVD\sources\install.wim" "Windows 7 HOMEPREMIUM (x64)" /compress maximum
Imagex /export "E:\AIO\WIMs\Windows_7x86_ULT.wim" 4 "E:\AIO\DVD\sources\install.wim" "Windows 7 PROFESSIONAL" /compress maximum
Imagex /export "E:\AIO\WIMs\Windows_7x64_ULT.wim" 3 "E:\AIO\DVD\sources\install.wim" "Windows 7 PROFESSIONAL (x64)" /compress maximum
Imagex /export "E:\AIO\WIMs\Windows_7x86_ULT.wim" 5 "E:\AIO\DVD\sources\install.wim" "Windows 7 ULTIMATE" /compress maximum
Imagex /export "E:\AIO\WIMs\Windows_7x64_ULT.wim" 4 "E:\AIO\DVD\sources\install.wim" "Windows 7 ULTIMATE (x64)" /compress maximum
The resulting D:\AIO\DVD\sources\install.wim (3,674,769 KB) is approx. a 67% space savings.
Note: Pick and choose which editions, customize any which way, however, for this article all of the above commands were used in the order listed. It would be helpful to copy all of the commands into a batch file and execute the batch.
Burn the DVD
The oscdimg.exe command is accessible by launching the Imagex, Deployment Tools Command Prompt. (ie. C:\Program Files\Windows AIK\Tools\PETools>).
At the prompt use this command to create the ISO image to burn to DVD.
oscdimg.exe -lWIN_AIO_DVD -t07/14/2009 -m -u2 -be:\aio\dvd\boot\etfsboot.com e:\aio\dvd e:\aio\windows7_aio_dvd.iso
The resulting ISO is less than 4GB. Use your favorite DVD burning software to create your DVD.
Appendix
About IMAGEX /INFO (optional reading)
Each WIM contains an index of available Microsoft Windows 7 editions. Using the command Imagex /info img_file, where img_file is the path of the WIM file to be queried for XML information, will list all available editions.

For example, Imagex /info E:\AIO\WIMS\Windows_7x64_ULT.wim will generate an XML displaying the values for each image. The WIM Information will display Image Count: 4. Scroll through the XML to reveal the indexes.
<IMAGE INDEX = “1”> … <NAME>Windows 7 HOMEBASIC</NAME>
<IMAGE INDEX = “2”> … <NAME>Windows 7 HOMEPREMIUM</NAME>
<IMAGE INDEX = “3”> … <NAME>Windows 7 PROFESSIONAL</NAME>
<IMAGE INDEX = “4”> … <NAME>Windows 7 ULTIMATE</NAME>
Each WIM will contain a unique set of indexed images. The index number and image name are essential to the process below. For this article, this process has been completed with the appropriate commands outlined below.
About IMAGEX /EXPORT (optional reading)
The following command options for IMAGEX are available for use with /EXPORT.
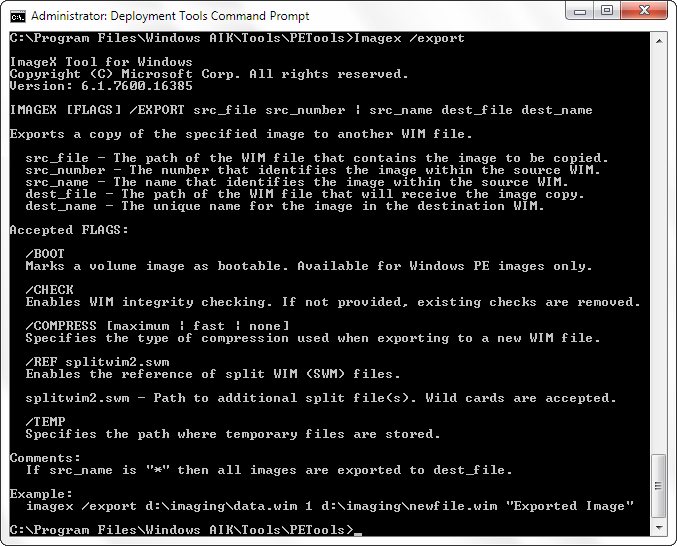
Usage: IMAGEX [FLAGS] /EXPORT src_file src_number | src_name dest_file dest_name
Exports a copy of the specified image to another WIM file.
src_file – The path of the WIM file that contains the image to be copied.
src_number – The number that identifies the image within the source WIM.
src_name – The name that identifies the image within the source WIM.
dest_file – The path of the WIM file that will receive the image copy.
dest_name – The unique name for the image in the destination WIM.
Other flags exist, however, the one of interest for this example is /compress
/COMPRESS [maximum | fast | none]
Specifies the type of compression used when exporting to a new WIM file.
About OSCDIMG (optional reading)
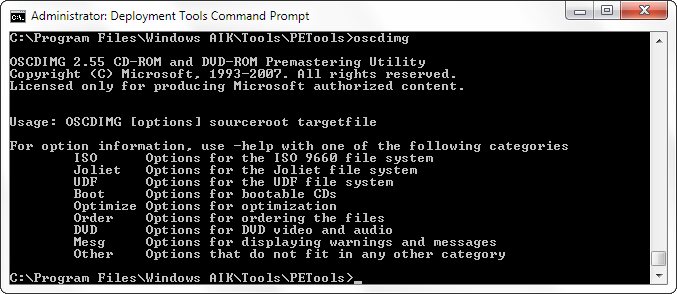
Usage: OSCDIMG [options] sourceroot targetfile
For option information, use -help with one of the following categories
ISO Options for the ISO 9660 file system
Joliet Options for the Joliet file system
UDF Options for the UDF file system
Boot Options for bootable CDs
Optimize Options for optimization
Order Options for ordering the files
DVD Options for DVD video and audio
Mesg Options for displaying warnings and messages
Other Options that do not fit in any other category
References
- http://www.windowsvalley.com/create-windows-7-aio-all-in-one-dvd-or-merge-all-editions-of-windows-7-in-single-dvd/
- http://g0b3ars.wordpress.com/2009/09/20/create-an-all-in-one-win7vistawindows-server-2008-discusb-stick/
- http://forums.overclockers.co.uk/showthread.php?t=18044180