There are many articles on the web that detail the installation of PHP on IIS6. Older, dated articles use the ISAPI that is no longer under development nor packaged with the more current versions of PHP. When an article describes the the installation of FastCGI for PHP and IIS, it is generally assumed that you have a working installation of PHP (?). Most articles assume that you know which version of PHP to install, whether it be non-thread-safe or thread-safe. Anyway, after thumbing through a few articles, I finally got a working installation of PHP under IIS with FastCGI. This article will provide detailed steps on how to achieve this. This article will not go into the detail as to the reasoning, there are other sites that do that very well. I would like to keep this as simple as possible.
This installation is made on a 32-bit edition of Microsoft Windows Server 2003 Enterprise edition with Service Pack 2 installed. One assumption will be made, IIS is already installed. Since PHP is used with IIS, choose PHP 5.3 VC9 Non Thread Safe. VC9 Versions are compiled with the Visual Studio 2008 compiler and require you to have the Microsoft 2008 C++ Runtime (x86) installed. (source)
Prerequisites
-
IIS 6
-
FastCGI 1.5 for IIS 6 x86
-
Microsoft 2008 C++ Runtime (x86) (filename: vcredist_x86.exe)
-
PHP 5.3.3 VC9 Non Thread Safe (filename: php-5.3.3-nts-Win32-VC9-x86.zip)
Install PHP
-
Download PHP 5.3.3 VC9 Non Thread Safe (filename: php-5.3.3-nts-Win32-VC9-x86.zip)
-
Unpack the content of the zip archive into a folder of your choice, for example C:\PHP\
-
Copy the C:\PHP\php.ini-production to C:\PHP\php.ini
-
Open the php.ini,search for the following lines, uncomment them and make sure they look like these below.
extension_dir = "C:\PHP\ext" error_log="C:\inetpub\temp\php-errors.log" cgi.force_redirect = 0 fastcgi.impersonate = 1 fastcgi.logging = 0 cgi.fix_pathinfo=1 -
Download Microsoft 2008 C++ Runtime (x86) (filename: vcredist_x86.exe)
-
Install Microsoft 2008 C++ Runtime (x86)
Install FastCGI
-
Download FastCGI 1.5 for IIS, 32-bit.
-
Install FastCGI 1.5. Just follow the installation process.
-
Using the CMD prompt, go to C:\Windows\System32\inetsrv
-
Execute the following commands (source)
cscript fcgiconfig.js -add -section:"PHP" -extension:php -path:"C:\PHP\php-cgi.exe"
cscript fcgiconfig.js -set -section:"PHP" -InstanceMaxRequests:10000
cscript fcgiconfig.js -set -section:"PHP" -EnvironmentVars:PHP_FCGI_MAX_REQUESTS:10000
Manually Create script mapping
Note: This may not be necessary, on one box it was on another it wasn’t.
- Launch inetmgr.exe.
- Double click the machine icon for the local computer.
- Right click on Web Sites and pick Properties.
- Click the Home Directory tab.
- Click the Configuration… button.
- Click the Add button.
Browse to the fcgiext.dll located in %windir%\system32\inetsrv. - Enter .php as the Extension.
- Enter Verbs as GET,HEAD,POST.
- Ensure that Script Engine and Verify that file exists are checked.
- Click OK.
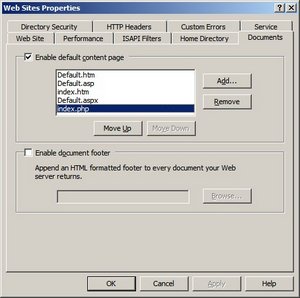
Configure the default document in IIS
Use the Internet Information Services Manager (IIS Manager) to configure the default document in IIS. Most of the PHP applications use a file named index.php as the default application document. (source)
-
Launch inetmgr.exe
-
Double click the machine icon for the local computer.
-
Right click Web Sites and pick Properties.
-
Click the Documentstab.
-
Click the Add button and enter index.php for Default Document Name:
-
Click OK.
Test the PHP installation
-
Create a file with the name phpinfo.php with the following line of content.
<?php phpinfo() ?> -
Save it in the C:\Inetpub\wwwroot folder.
-
Go to your Internet Explorer and in the address bar type http://localhost/phpinfo.php
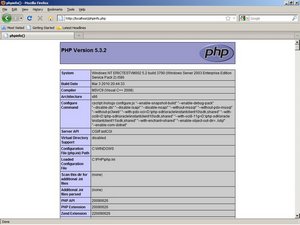
This will get you a working installation copy of PHP. However, there may be extensions you need to access under the C:\PHP\ext folder. To utilize these extensions, you will need to uncomment the specific ones of choice in your C:\PHP\php.ini file.
This installation has been successfully tested, twice on April 28, 2010.
1 Comment
Comments are closed.