A client recently brought me a hard drive they suspected was infected. Internet Explorer was constantly redirecting, and neither their antivirus nor anti-malware tools could resolve it — some didn’t detect anything at all, while others claimed to remove the infection only for the problem to return. With no other options, they pulled the drive and handed it to me.
I mounted the drive in a USB sled and connected it to a separate workstation. Since the drive wasn’t booting its own OS, I had full access to the filesystem — including folders that are normally locked during a live session.
Part 1 — Clean the Drive First
Before scanning anything, I clear out all the junk files. There’s no point running a scan on files that need to be deleted anyway — it just wastes time. This system was running Windows XP.
Windows folders to clean:
%WINDIR%\$NTServicePack*
%WINDIR%\$NTUninstall*
%WINDIR%\Minidump\*
%WINDIR%\Prefetch\*
%WINDIR%\SoftwareDistribution\*
%WINDIR%\Temp\*
User profile folders — repeat for each user profile on the machine:
%USERPROFILE%\%USERNAME%\Temp\*
%USERPROFILE%\%USERNAME%\Temporary Internet Files\*
%USERPROFILE%\%USERNAME%\History\*
Note: Tools like CCleaner only clean the currently active user profile. When working from an external drive, you can manually clean every profile on the machine.
System Volume Information:
Because the drive isn’t running its own OS, the System Volume Information folder — which normally houses System Restore backups — is accessible. I clear this out entirely. If a virus is present, you don’t want it hiding in a restore point.
C:\System Volume Information\*.*Important: This applies to Windows XP only. Do not do this on a Windows Server 2003 machine — the System Volume Information folder serves a different purpose there.
Finally, empty the contents of the RECYCLER and RECYCLED folders on all drives.
This isn’t an exhaustive list, but clearing these locations significantly reduces the number of files that need to be scanned.
Part 2 — Visually Inspect for Out-of-Place Files
This part is less of a science and more of a skill built over years of cleaning infected systems. I navigate to the System32 folder, sort by Date Modified, and focus on the most recently changed files.
Most users don’t install software frequently, so files that are noticeably newer than everything else stand out. In my experience, the majority of viruses, trojans, and malware drop at least one file in this folder.
On a clean system, most files in System32 will share similar modification dates. If a problem only recently surfaced, it’s reasonable to assume the offending file is among the newest ones. A quick review of those files is usually enough to flag anything suspicious. The image below highlighted in green indicates file dates of interest.
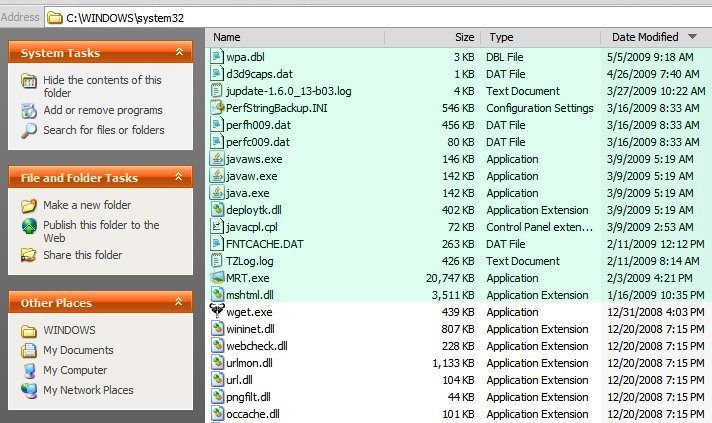
Nothing alarming there. But a deeper look into C:\Program Files told a different story on the client’s machine. There was a folder called C:\Program Files\Quicky Plaeyr containing a single file: Uninstall.exe. The misspelling and the lone file were immediate red flags. A quick Google search confirmed it — this was the Zlob virus. McAfee hadn’t flagged it, but it was gone within seconds of finding it.
This is not a comprehensive guide — it’s a rough framework based on hands-on experience. If any of this feels outside your comfort zone, it’s worth having someone experienced handle it. But if this approach makes sense to you, it should give you a solid starting point for tackling an infected drive manually.