Contents
A group of users needed to change from one FTP client application to another. There was no conversion available for the original FTP application, only a spreadsheet that had been maintained. There was a need to bulk add a couple of hundred ftp accounts into a new FTP client. The selected FTP client is FileZilla. A little known tidbit about FileZilla is the implementation of the file fzdefaults.xml. With the placement of this file in the installation folder of FileZilla, this will make available a default set of FTP sites that may not be edited by the end user. There is also room for the end user to create their own FTP sites, as a separate file without impacting the default set. The goal is to create a master fzdefaults.xml file with the import of a spreadsheet generated csv file and distribute as necessary.
Materials Used
- Microsoft Excel to convert the spreadsheet to a csv file.
- MySQL –within an XAMPP install
- php – within an XAMPP install
- HTB 2.0 (optional) source code beautifier
- FileZilla
Convert the Spreadsheet
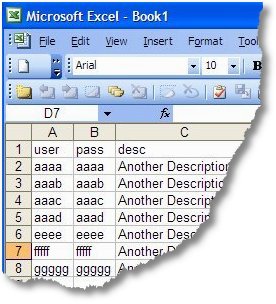
Convert the spreadsheet to a universally accepted file format of csv. There were four columns within the spreadsheet that is of interest, user, password, description, and ftpsource. I removed all other columns that may have existed. Later, when we create the tables, I will rename these for simplicity to user, pass, name, and ftpsite.
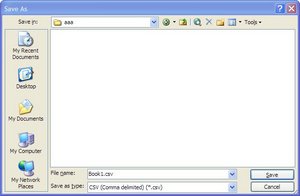
- In Excel, save the spreadsheet as a csv file.
Go to File > Save As > filename.csv (and select .csv from Save As type).
- When presented with a pop-up, press OK

- When presented with another pop-up, press Yes

- Exit out of Excel, you have saved the file as a .csv.


Import the csv file into a MySQL database
- Launch MySQL command line
mysql -u username -p
password: *****
- Create a MySQL database, in this case, ftpaccts
- Switch to the database ftpaccts
- Add tables to the database ftpaccts
- Add data to the database by importing the csv file
create database ftpaccts;
use ftpaccts;
CREATE TABLE IF NOT EXISTS `ftp_data` (
`user` varchar(18) collate utf8_unicode_ci default NULL,
`pass` varchar(12) collate utf8_unicode_ci default NULL,
`name` varchar(85) collate utf8_unicode_ci default NULL,
`ftpsite` varchar(30) collate utf8_unicode_ci default NULL
) ENGINE=MyISAM DEFAULT CHARSET=utf8 COLLATE=utf8_unicode_ci;
load data LOCAL infile 'ftpacctstest.csv' into table ftp_data fields terminated by ',' lines terminated by '\n' (user,pass,name,ftpsite);- If you want to verify the data in those tables
SELECT * FROM `ftp_data` LIMIT 0 , 30;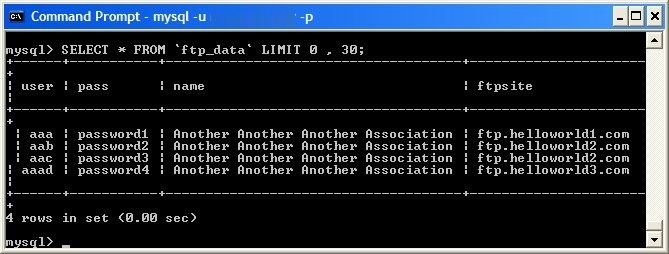
Note: Some of the code above was taken from phpMyAdmin, here, and here.
PHP Files
Create four php files to access the database and return the values to the screen. The source for the config.php, opendb.php, and closedb.php is from here. access.php is my source derived from the lessons learned from here.
Configuration
<?php
// This is an example of config.php
$dbhost = 'localhost';
$dbuser = 'root';
$dbpass = 'password';
$dbname = 'ftpaccts';
?>
Open the Database
<?php
// This is an example opendb.php
$conn = mysql_connect($dbhost, $dbuser, $dbpass) or die ('Error connecting to mysql');
mysql_select_db($dbname);
?>
Close the Database
<?php
// an example of closedb.php

// it does nothing but closing
// a mysql database connection

mysql_close($conn);
?>
Access the Database
Note: The code below has been altered by WordPress and will not provide the desired results. The correct code is available here for download.
 905_PHPScript (715 bytes, 1,476 hits)
<?php
// an example of access.php

include 'config.php';
include 'opendb.php';

$query = "SELECT user, pass, name, ftpsite FROM ftp_data";
$result = mysql_query($query);

echo '<?xml version="1.0" encoding="UTF-8" standalone="yes" ?> <br/>' .
"<FileZilla3> <br/>" .
"<Settings> <br/>" .
'<Setting name="Config Location">.</Setting> <br/>' .
'<Setting name="Kiosk mode">0</Setting> <br/>' .
'<Setting name="Disable update check">0</Setting> <br/>' .
"</Settings> <br/>" .
"<Servers> <br/>";

while($row = mysql_fetch_array($result, MYSQL_ASSOC))
{

echo "<Server> <br/>" .
"<Host>{$row['ftpsite']}</Host> <br/>" .
"<Port>21</Port> <br/>" .
"<Protocol>0</Protocol> <br/>" .
"<Type>0</Type> <br/>" .
"<Logontype>1</Logontype> <br/>" .
"<User>{$row['user']}</User> <br/>" .
"<Pass>{$row['pass']}</Pass> <br/>" .
"<TimezoneOffset>0</TimezoneOffset> <br/>" .
"<PasvMode>MODE_DEFAULT</PasvMode> <br/>" .
"<MaximumMultipleConnections>0</MaximumMultipleConnections> <br/>" .
"<EncodingType>Auto</EncodingType> <br/>" .
"<BypassProxy>0</BypassProxy> <br/>" .
"<Name>{$row['name']}</Name> <br/>" .
"<Comments></Comments> <br/>" .
"<LocalDir /> <br/>" .
"<RemoteDir />{$row['name']}<br/>" .
"</Server> <br/>";
}

echo "</Servers> <br/>" .
"<Queue /> <br/>" .
"</FileZilla3> <br/>";

include 'closedb.php';
?>
Save the files to your web server, in my case XAMPP, so therefore it would be Apache, htdocs folder.
Output
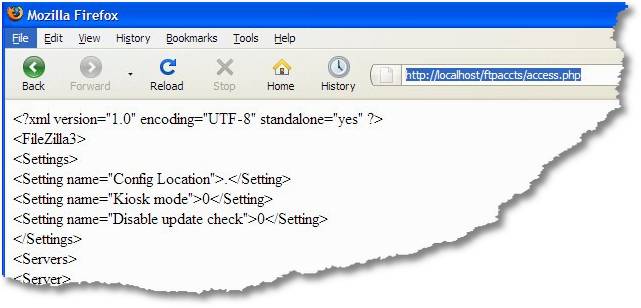
Using your favorite web browser, type in the web address, in this example http://localhost/ftpaccts/access.php. The results would look something like the following:
- Highlight and select all and save to a text file, I called mine fzd.xml. Do not use File and save as, as it will save all the html code. We want what we see.
- Open the text file with your favorite editor, I use the free Notepad++. Use a search and replace for the & character as some users may have a password or description that uses that character. Change the & to & to resolve any issues preventing the generated code from being XML validated. Note: To validate my output, I just dragged and dropped the xml onto a Firefox window, it either pointed out the error or correctly displayed the xml.
- This step is optional. I wanted to beautify the xml output. I found a free, command-line utility to reformat HTML/XML/XSLT source code, called HTB 2.0. Here is the option I chose.
htb -n fzd.xml fzdefaults.xmlFilezilla
Before continuing, I made a backup of my Filezilla settings, accounts, etc. in the event something went wrong. Note that nothing went wrong. To find out more about what the fzdefaults.xml file is capable of, look in your FileZilla installation folder, C:\Program Files\FileZilla FTP Client\docs\fzdefaults.xml.example.
- Copy the fzdefaults.xml to the Filezilla installation. ie. C:\Program Files\FileZilla FTP Client
- Execute Filezilla and go to File > Site Manager and you should see a populated list. Also note that the contents of the general tab are greyed out, to prevent the end user from messing with them.
- Done.